Posted at Serverless by Juan Urrego
In Part 1 of this series we covered the basic definitions and basic project setup. Now in this article I’ll introduce some tools and tactics to configure your local development environment, to emulate your serverless production environment. Let’s start!
One of the biggest features of Serverless is the ability to manage the whole life cycle of your application. That includes the creation, update and eventual destruction of your infrastructure. This infrastructure management using a descriptive model is called Infrastructure as Code (IaC). CloudFormation, Terraform and Heat, are just some examples of this new DevOps (maybe NoOps) revolution. So in case of Serverless, let’s try to understand how it works:
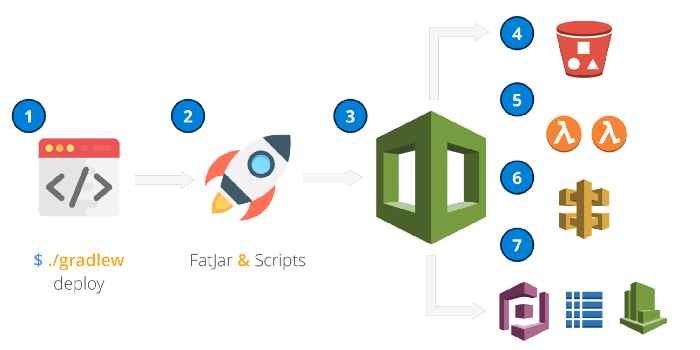
First we execute the deploy command using gradle, this command will build & test your Kotlin code.
Behind the scenes, Shadow creates a FatJar with all the things we may need in the future.
After that, Serverless creates two files: cloudformation-template-create-stack.json and serverless-state.json (you can find both files in the .serverless directory).
Serverless creates an S3 Bucket where the stack and state will be saved, then Cloudformation uses those files and executes those “construction plans”, resulting in new/updated AWS Lambda functions, API Gateway endpoints (including all the routing), and support resources, such as Cognito Pools, DynamoDB and Cloudwatch alarms. Let’s take a look at the result of one of these executed plans.
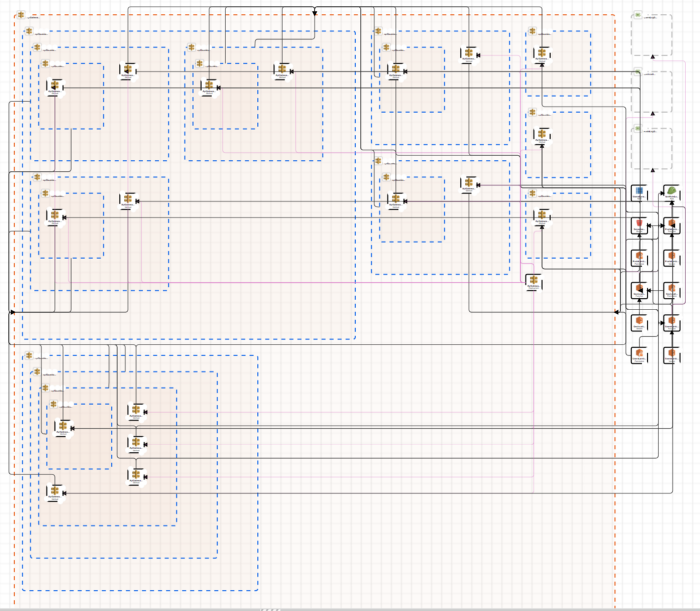
The previous image is one of the reasons why managing the infrastructure’s life cycle manually is not an option.
We already know that Serverless will be in charge of deploying your app, including all required IaC. However, if AWS is controlling the infrastructure, how can I test it locally? This is a huge problem because a serverless architecture means that all the required services and infrastructure are not being managed by you.
Using the Cloud
My first approach was to have a development account where I can deploy continuously without issues. The problem started when my internet connection became a bottleneck. The current size of my FatJar was bigger than 32MB, so that means that every single time that I needed to test my code I had to upload 32MB. One day, my home upload bandwidth was 0.87 Mbps, meaning 0.10875 MB/s. So in average a basic test would take 5 minutes (and in some cases it took 10 to 15 minutes) to be completed. This is quite ridiculous, particularly with small changes.
Additionally, this option is not scalable if you have a team working on a serverless project. Just imagine the way to manage functions per developer, as well as the possible costs that this solution represents.
What about a CI/CD for fast deployment?
The next option was to use a CI/CD software, so I just needed to upload my changes using GIT and it would trigger a new pipe. In my case, I’m using Bitbucket as my repository, so I decided to use Bitbucket Pipelines for all the CI/CD tasks. The solution reduced the time-to-test to 2:30–3:00 minutes but it was still long for basic tests.
Ironically, on premise is the solution
That situation made me realize that I needed a local solution. Currently in the market you can find a lot of options like Emulambda or Eucalyptus. But maybe the most complete and stable (at least for AWS) products in the market are SAM Local and LocalStack. But which one should I use? Maybe both? What are the pros and cons of each one?
SAM Local is a Beta tool from AWS that helps us manage Serverless applications. With this tool we can use a template.yml file with all the definitions that we need and the tool will make the rest. From emulating events to estimating cost per request, SAM Local has it all. The only issue we faced was the fact that we were not using SAM as our serverless framework. But no problem at all, there’s already a Serverless plugin to help you with that! The next sections are based on the article “Go Serverless with SAM for local dev & test”, so thanks to Erica Windish for sharing her personal experience. In my case, I’m going to explain a bit more in detail, as well to give you specific tips for Kotlin/Java projects.
Installation and Basic Configuration
First, you need to install Docker. To emulate the infrastructure, SAM Local uses Docker containers. Please follow the instructions according to your operating system. If you want to verify that your docker is working just execute:
Once docker is installed, create a package.json file in your project’s root directory. You can create a basic file like this:
{
  **"name"**: "my-hello",
  **"version"**: "1.0.0"
}
Now we are ready to install plugins! Let’s try serverless-sam, a plugin that converts serverless.yml files to template.yml (the one required by SAM Local).
**npm** install **--save-dev** serverless-sam
Note: If you have errors with the previous command you can also install it using the Serverless plugins.
**sls** plugin install **– name** serverless-sam.
With serverless-sam installed, update the serverless.yml to include it.
**plugins:**
  - serverless-sam
Running it
SAM Local uses the FatJar from your compilation process, which is why you need to build your code every time you want to test locally.
*# Builds the fatJar (I'm excluding tests for fast builds)
**gradle **build shadowJar **-x **test

*# Export and invoke your functions*
**sls **sam export **-o **template.yml
**sam **local invoke **FunctionName **<<< "{}" # JSON Event*
Note: You will always need to run this command every time you want to test your lambda function. By default the function names will start with capital letter. Don’t forget to explicitly define your AWS::Serverless::Function in the template file.
For testing purposes, it’s convenient to have a set of JSON files with example requests. The Serverless website presents a Lambda Proxy event example, so I recommend creating multiple files (for multiple events) to simulate the requests you may need. For this example project I created a file in src/test/resources/eventHelloGET.json (it’s possible that you have to create the resources directory).
Once you’ve created an event JSON file, you can execute the invoke command with your preference event file using -e option. Try this:
**sam** local invoke Hello **-e** src/test/resources/eventHelloGET.json
Quite impressive, isn’t it? I also recommend adding scripts to your package.json file, so you don’t need to remember and repeat all the steps that I’ve already mentioned. Try changing it with something like this:
Now you can run your test event using this command:
**npm **run getHelloEvent
Testing the Endpoints
A really cool feature about SAM Local is that you can also test using the API Endpoint. If your function has http events, you can use this option and test with your favorite RestClient (I’m using Postman).
To test your endpoints, just execute the next command:
**sam** local start-api -d 5858
It will run a local server with your API’s so you can easily test it with a RestClient or a curl command like this (check the URLs that the terminal shows, by default it should be http://127.0.0.1:3000/function_name)::)
**curl** -i -H "Accept: application/json" -H "Content-Type: application/json" -X GET http://127.0.0.1:3000/hello
The other option that you have is to use LocalStack. One of the main features of this product is that it will create a complete AWS infrastructure in your own machine. Sounds cool! However, in the process I found a few issues, specifically between Java Lambda Functions and the compatibility of Serverless plugins. In any case, let’s take a look!
Installation and Basic Configuration
Like in the previous case, I recommend installing docker to run your containers for two main reasons: 1) When you run it with docker, LocalStack starts an app to visualize your local infrastructure (something useful for fast reading) and 2) I have found that docker is much more stable than using pure Python environments. I had a lot of issues even with specific virtual environments. And again, follow the instructions according to your operating system.
As I already mentioned, you can follow the official step by step guide from LocalStack Github and install it using pip. If you’re using this option, please create a virtual environment for that. In my case, I use mini-conda to manage all my python projects. However, I prefer to use a pure docker option. To do that, you can download LocalStack’s docker-compose yaml and put it in the root of your project. In my case I copied something like this:
The only difference with the original one is that I’m setting my local volume in the project’s root path folder .localstack. In that order of ideas, we can check how LocalStack “uploads” and manages our files to emulate AWS. Once everything is set, run:

Using this command you should be capable of accessing the local infrastructure visualizer using your browser. Go to http://localhost:8080, where you should see something like this:
Just like SAM Local, LocalStack also has a Serverless plugin that can help us reference our local endpoints instead of the real ones in AWS. First of all install serverless-localstack using this command:
**npm** install **--save-dev** serverless-localstack
Once this plugin is installed we just need to configure the new plugin in our serverless.yml file.
**plugins:**
  - serverless-localstack
Something cool that we can do with this plugin is to define our local endpoints using a json file. In my root path I created a localstack.json file with this information:
This plugin gives us the opportunity to isolate our local environment using LocalStack while our production and pre-production environments use the real AWS infrastructure. To achieve that in the serverless.yml file include this:
**custom:
  localstack:
    stages:
      **- local
      - dev
    **endpointFile: **localstack.json
As you can see, we also define the path to our localstack.json file, where we defined our local endpoints.
Let’s run it
Now we can run it using our classic:
**./gradlew deploy**
And… it will fail, but why? Well, the reason is that by default, serverless takes our FatJar and uploads it as it is to AWS. However, there is a bug with LocalStack and it can’t perform this action if it doesn’t have a ZIP file. So basically I made 2 changes:
Add these lines to your build.gradle:
task buildZip(type: Zip, dependsOn: shadowJar) {
from 'build/libs/'
include '*-all.jar'
archiveName "com.myblockbuster-${version}-all.zip"
destinationDir(file('build/libs/'))
}
task deploy(type: Exec, dependsOn: 'buildZip') {
commandLine 'serverless', 'deploy'}
These lines define a new task that creates a ZIP file from the FatJar, and also modifies the deploy task to depend on the new ZIP task.
Modify the serverless.yml file to indicate that you are going to upload the zip instead of the jar.
package: artifact: build/libs/com.myblockbuster-dev-all.zip
Now we should be capable to run the next command:
**serverless** deploy --stage local
It should run quite nice except for a final error:
Serverless Error ---------------------------------------ServerlessError: Attribute without value
Line: 13
Column: 70
Char: aGet Support --------------------------------------------
     Docs:          docs.serverless.com
     Bugs:          github.com/serverless/serverless/issues
     Forums:        forum.serverless.com
     Chat:          gitter.im/serverless/serverlessYour Environment Information -----------------------------
     OS:                     darwin
     Node Version:           8.9.1
     Serverless Version:     1.25.0
This is a LocalStack issue and the main reason is that it is not processing the result values properly, so the resulting XML file is not obtaining the correct resource IDs. Instead of the required IDs, LocalStack returns the Object String from Python’s emulated classes.
In any case, now you should be able to see something like this in the Infrastructure Overview Page:
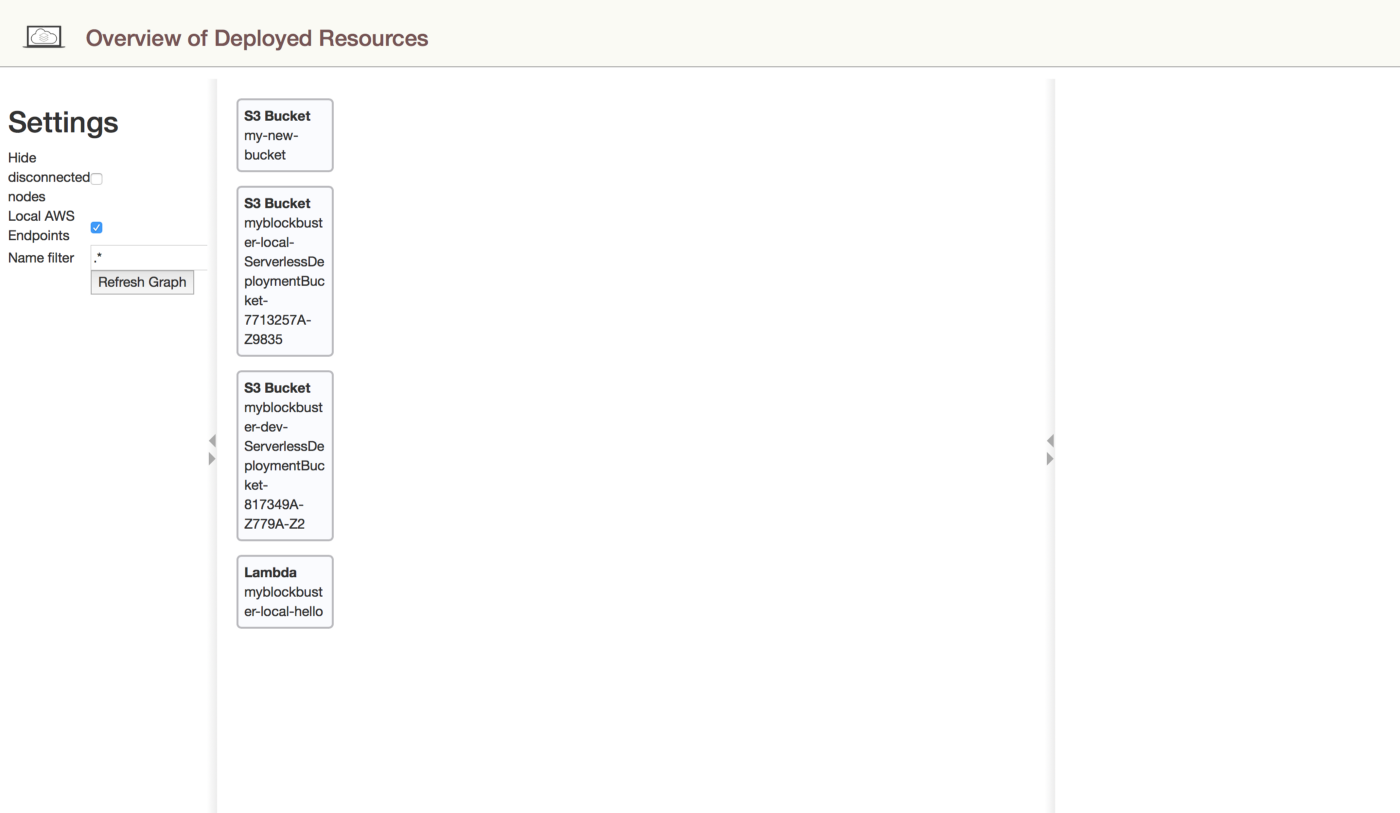
If you want to test your created resources, you can always use the official AWS-CLI. However I found a library called awscli-Local, which already knows the LocalStack endpoints and you can use just like the official one from AWS. I’m presenting a couple of useful commands that you might need:
**awslocal** apigateway get-rest-apis
**awslocal** apigateway get-rest-api --rest-api-id **REST_API_ID**
**awslocal** apigateway get-resources --rest-api-id **REST_API_ID**
**awslocal** apigateway get-deployments --rest-api-id **REST_API_ID**

**awslocal** apigateway get-deployment --deployment-id **DEPLOY_API_ID** --rest-api-id **REST_API_ID**

**awslocal** apigateway get-integration --rest-api-id **REST_API_ID** --http-method GET --resource-id **RESOURCE_API_ID**

**awslocal** lambda list-functions
Now you should be asking: What is the real difference between each one? What are the benefits and cons? Let’s analyze the main features:
Lambda & API Gateway Infrastructure Emulation
LocalStack ✅
SAM Local ✅
Support Other Infrastructure Emulation (S3, Dynamo, RDS, etc)
LocalStack ✅
SAM Local ❌ (It’s just for testing lambda functions and endpoints)
Serverless Plugin
LocalStack ✅
SAM Local ✅
Stability and Reliability with Serverless Framework
LocalStack ❌ (the serverless plugin and Java + Lambda is not reliable yet)
SAM Local: ✅
Community and Support
LocalStack ✅
SAM Local ✅
Easy to configure and test
LocalStack 🔶 (it’s not bad, but requires more configuration and workarounds)
SAM Local ✅
Final Thoughts
Definitely, the use of an emulation software is a MUST during the development process. SAM Local is an incredible tool that will help you test your functions and API locally. On the other hand, we have LocalStack, which gives us the opportunity to emulate S3 buckets, Dynamo tables, Lambda infrastructure, etc. In my personal experience, SAM Local + Serverless is really good and stable, while LocalStack + Serverless gave me a lot of headaches, especially because it’s not following standard behavior in certain cases (like the problem with the zips and jars).
In general terms, I would recommend using SAM Local for your Serverless + Kotlin projects and, if you have a small team, sharing certain cloud resources such as S3 buckets and Dynamo tables shouldn’t be a big deal. Nevertheless, if you have a big team with multiple cloud dependencies, I would rather prefer to use LocalStack and assume some of the current limitations and bugs that it has.
Originally published at Medium
Originally published at https://www.serverless.com.

